Rooftop Solar Plant : The 300 units free electricity scheme, announced as part of the Budget 2024, is a part of the Pradhan Mantri Suryodaya Yojana. Under this scheme, households that install rooftop solar panels will be provided with up to 300 units of free electricity every month. It is estimated that this initiative will benefit around 10 million households, resulting in significant annual savings of up to Rs 15,000-18,000.
Table of Contents
Toggle300 Units Free Electricity Scheme Apply Online

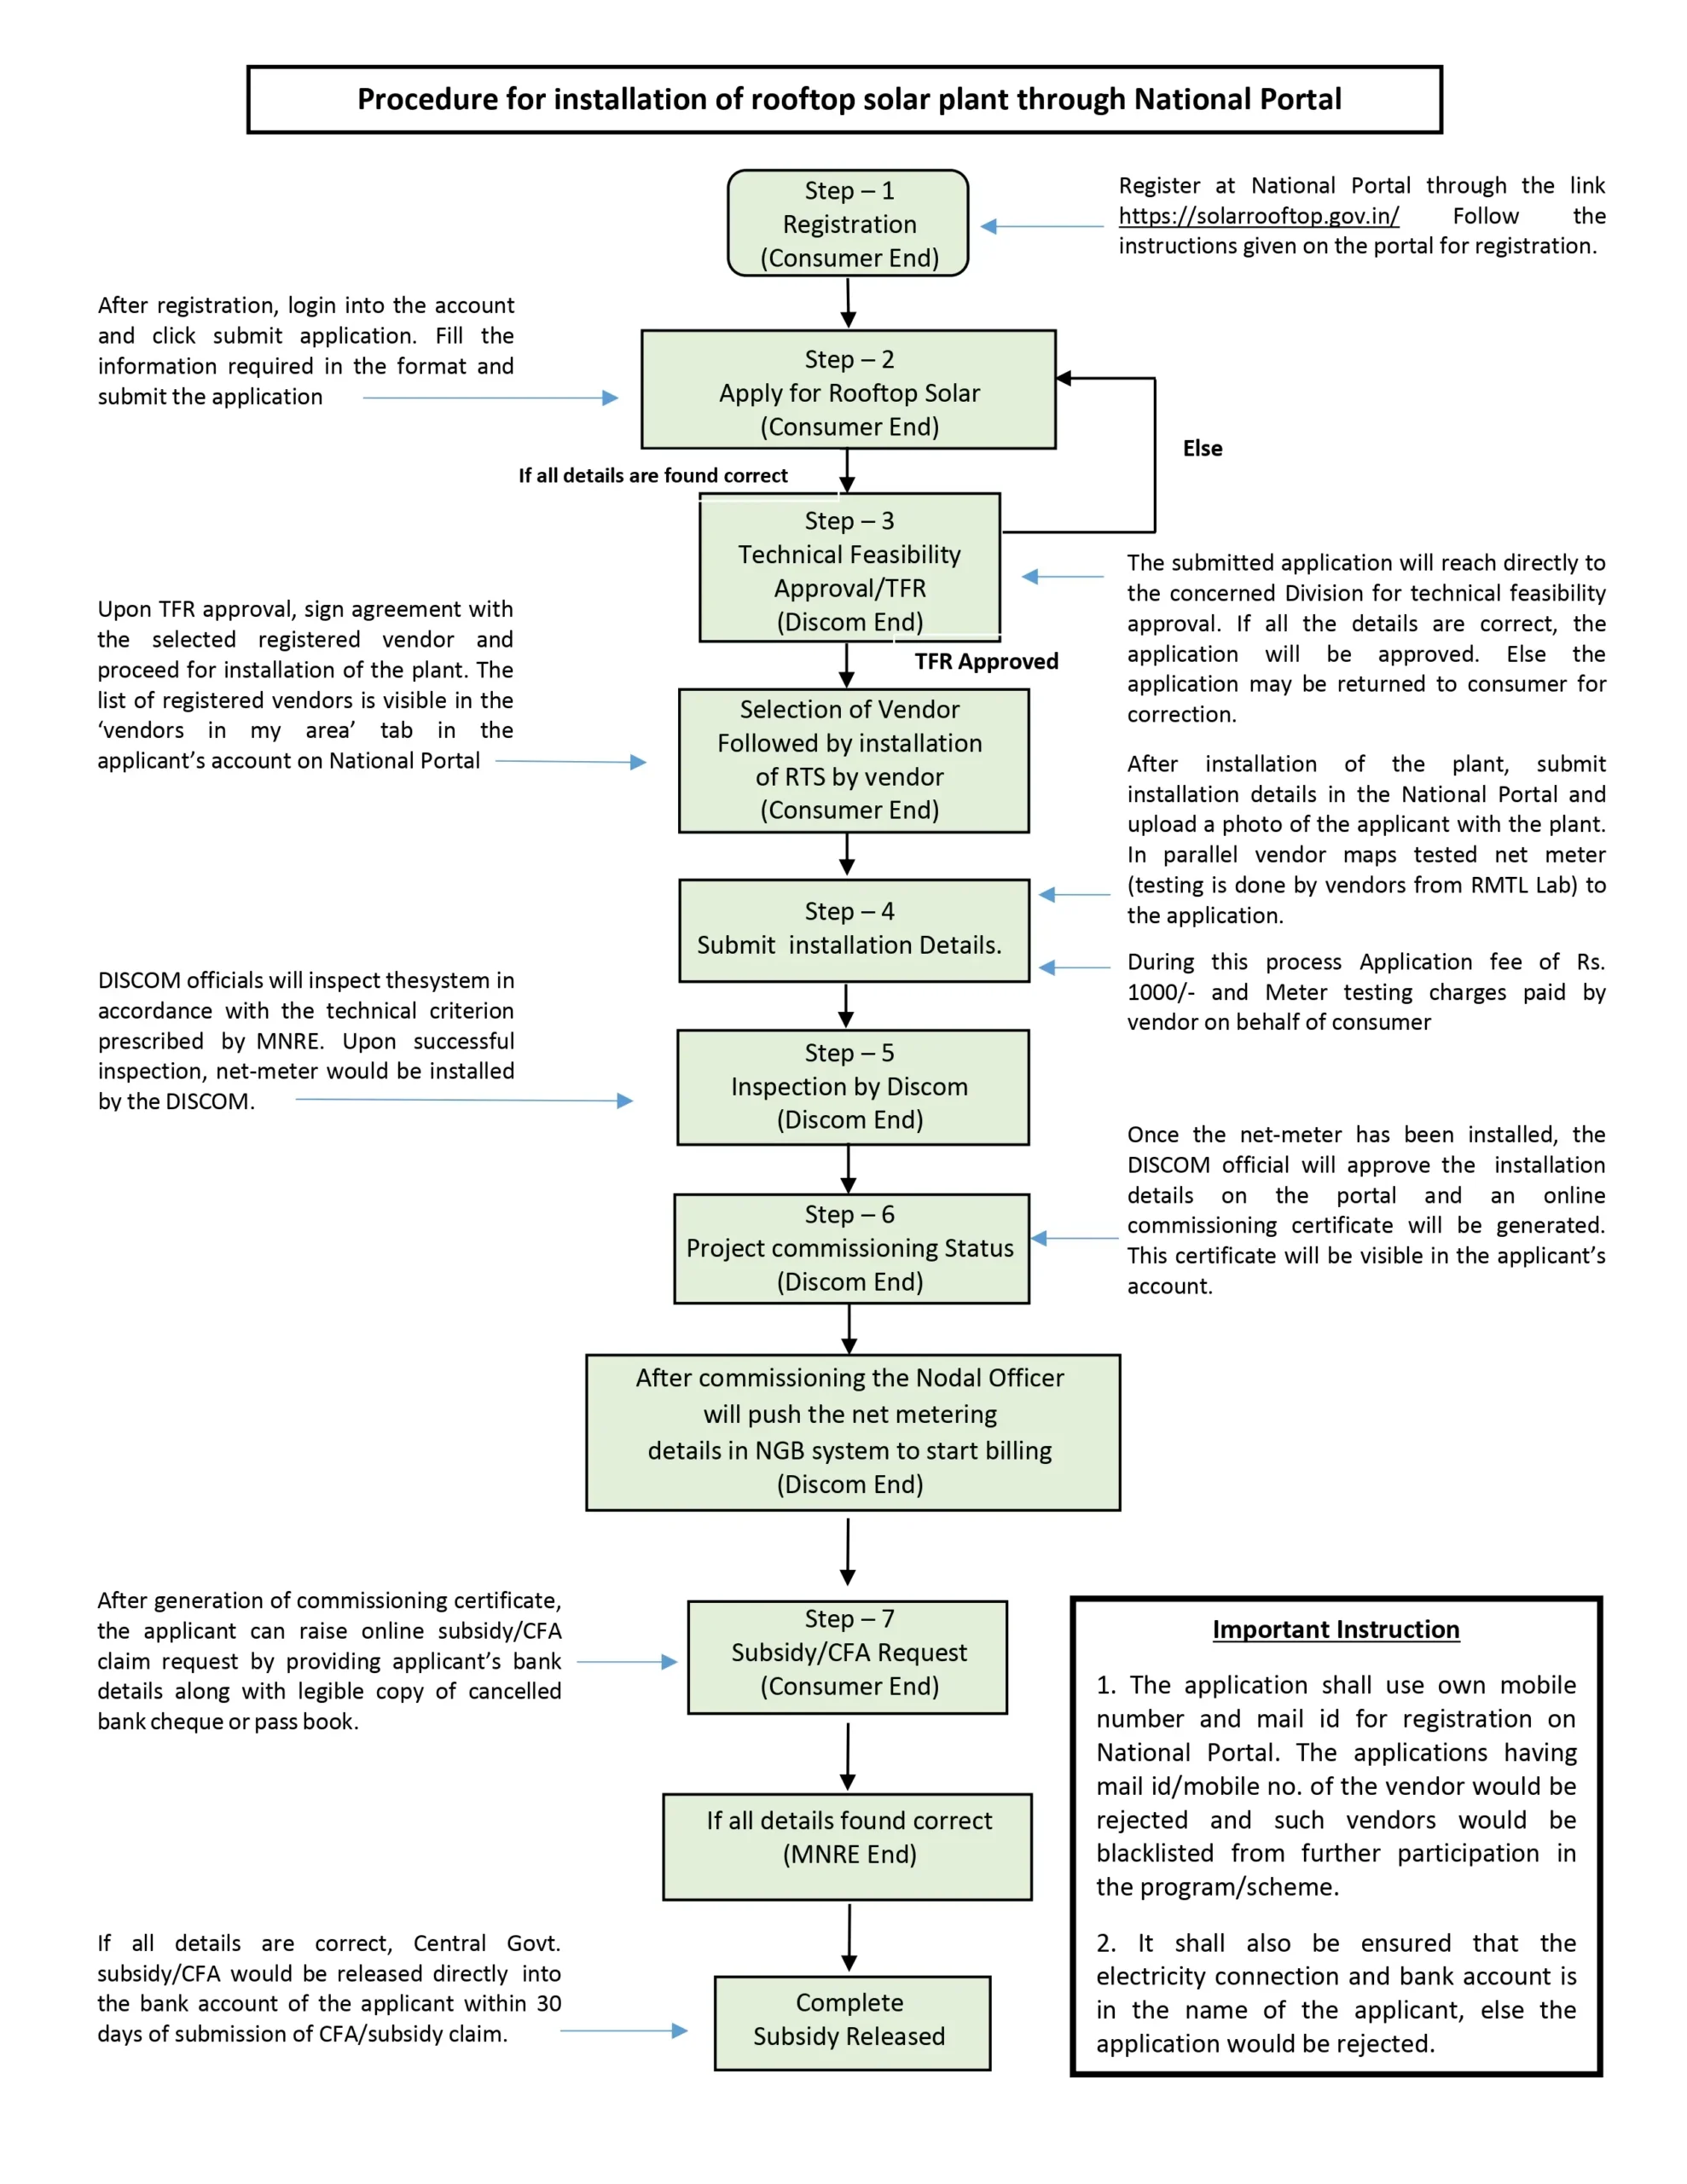
Process for installation of Rooftop Solar system at residential house
1. Download and Register:
- Download the SANDES app.
- Register on the National Portal – CLICK HERE
- Select your local DISCOM (electricity distributor).
- Enter your electricity connection number, email, and mobile number.
- Verify your mobile number with OTP and activate your account through email.
2. Apply for Installation:
- After successful registration, submit an application for grid-connected rooftop solar installation.
- Pre-filled information will be available from your registration.
- Enter additional details like name on electricity bill, address, proposed system capacity, and existing solar capacity (if any).
- Upload a copy of your latest electricity bill.
- You’ll receive a copy of the application via email and can download it from the portal.
3. Get Technical Approval:
- Your application will be forwarded to your DISCOM for technical feasibility approval.
- Wait for approval before initiating installation.
- You’ll be informed of the approval or rejection via email.
4. Choose a Vendor and Install:
- Upon receiving approval, select a DISCOM-registered vendor to install the system.
- Adhere to the Ministry’s minimum technical specifications and standards.
- You can choose higher quality/efficiency equipment.
- Use domestically manufactured solar modules and BIS-certified inverters.
- Sign an agreement with the vendor (model format available on the National Portal).
- The vendor must provide comprehensive maintenance for at least 5 years.
5. Complete Installation and Apply for Net Metering:
- Submit project completion details to the portal, including wattage, module make and numbers, inverter make and wattage, vendor name, and system photographs.
- Apply for net metering.
- Follow DISCOM instructions regarding net metering charges and agreements.
6. Net Meter Installation and Inspection:
- DISCOM officials will install the net meter and inspect the system for compliance with standards.
7. Commissioning Certificate:
- Upon successful inspection, a commissioning certificate will be generated online by the DISCOM.
8. Submit Bank Details and Receive Subsidy:
- Provide bank details and upload a copy of a canceled cheque.
- The central government subsidy will be released directly into your account.
- Check the National Portal for subsidy details.
Breaking Down the Rooftop Solar Plant Bill of Materials
Power Players:
- Solar PV Panels: These convert sunlight into electricity. Choose panels that meet MNRE specifications and are registered with ALMM (Approved List of Module Manufacturers).
- Grid-Connected Inverter: Converts DC electricity from the panels into AC electricity for your home and connects it to the grid. Ensure it complies with MNRE/BIS standards.
Support Crew:
- Module Mounting Structure: Holds the panels securely on your roof. Opt for galvanized steel structures following applicable IS standards.
- Structure Accessories: Stainless steel 304 components ensure the mounting structure’s stability and durability.
- Net Meter and Solar Meter: Track the electricity generated by your system and the net amount you consume/export to the grid. These must meet DISCOM (electricity distribution company) requirements.
The Wiring:
- Array Junction Box: Protects the DC connections between panels and the inverter.
- AC Distribution Board: Distributes AC electricity from the inverter to your home and protects against overloads. Choose one that meets inverter and DISCOM/grid requirements.
- Solar DC Cables: Connect the panels to the junction box. Ensure they comply with MNRE specifications and are sufficient in length (typically 50 meters).
- AC Cables: Connect the inverter to your home’s electrical system. Again, follow MNRE specifications.+
- Earthing: Provides safety grounding for the entire system according to MNRE specifications.
Additional Elements:
- Lightning Arrestor: Protects against lightning strikes. Choose one that meets MNRE specifications.
- Connectors and Conduit Pipes: These connect and enclose the wiring for safe and organized operation.
- Other Items: Depending on your specific needs, additional components like monitoring systems or batteries might be included.
Quality Assurance:
- Installation Testing & Commissioning: Ensures everything is installed and functions safely and efficiently.
- Civil Materials and Work: If structural modifications are needed for mounting the system, ensure they comply with MNRE specifications.
- Performance Testing: Verifies the system’s efficiency. Aim for at least 75% performance.
- O&M and Warranty: Provides peace of mind with maintenance and warranty coverage for at least 5 years.
Operation and Maintenance Guidelines of Grid Connected PV Plants
To ensure optimal performance and longevity of your grid-connected photovoltaic (PV) plant, regular maintenance is essential. This includes keeping all components clean, checking that they are securely fastened, and performing specific maintenance tasks as outlined below.
General Maintenance Rooftop Solar Plant
- Fasteners: Periodically inspect all mounting hardware and electrical connections to ensure they are secure and free of corrosion. Tighten any loose bolts or nuts.
- Vegetation Control: Trim trees or shrubs that may shade the solar panels, reducing their energy production.
- Cleaning: Regularly remove dust, dirt, and debris from the solar panels using soft brushes and clean water. Avoid using harsh chemicals or abrasive materials that can damage the panels.
Maintenance by Vendor (during the first 5 years)
During the mandatory operation and maintenance (O&M) period, typically 5 years, the vendor responsible for your PV plant installation will handle specific maintenance tasks assigned to electricians and technicians. They will also provide you with guidance and documentation for tasks you can perform yourself, such as:
- Monitoring: Regularly monitor your PV system’s performance using its monitoring system or app. This will help you identify any potential issues early on.
- Snow Removal: If you live in an area with snowfall, remove snow from the panels promptly to prevent damage and ensure optimal energy production.
- Animal Deterrence: Take steps to deter birds and other animals from nesting on or near the panels, as their droppings can affect system performance.
Specific Component Maintenance
- Solar Panels: In addition to regular cleaning, visually inspect the panels for cracks, chips, or other damage. If you notice any damage, contact your vendor immediately.
- Inverter: The inverter is a critical component that converts DC power from the panels into AC power for your home. Follow the manufacturer’s recommendations for cleaning and maintenance.
- Wiring: Inspect all electrical wiring for signs of damage or wear. Tighten any loose connections and promptly address any issues.


